NavMenu

Showing posts with label diy. Show all posts

Easy Valentine's decor idea


Today is a wonderful day! And not only because I have vacation  :) 
Valentines day is just right behind the corner and today I put out a decoration of something lovely for myself and my boyfriend. Yes, candies!


 Even if you are living alone or with a cat, there is no reason, why you shouldn't cheer yourself up with something tasty!


 This time I used little hard boiled candies with hearts, but if you prefer black chocolate or marshmallows - go ahead and stock with them some glass jars! If you have big red wine glasses, instead or drink, fill them with red candies. 


Do you have any candies you usually use for Valentine's day decors?

How to find a pin's origin?

Am I the only one who sometimes feels in love with some pin on Pinterest so much that there is a huge urge to check out the blog or web site it came from? I believe it's not something rare as we all know how many great tips and tricks and just inspiration could be found in one simple site! However, sometimes it's not so easy because a pin has a direct link which opens only one particular photo, not the whole page it comes from. Here I have one simple tip, how to get to the page of your new favorite DIY project!
Note, this works only using Chrome browser!

So here is one pin  (on the right) with a beautiful photo of nice packing idea I wanted to look at more. 
I find it really disturbing when clicking on a pin (as in this example with packing idea) it opens a direct link of the picture which gives you no idea which page it could be from (I am talking about this).
So, when that happens, right click on the picture and choose Search Google for this image.

There will be a new tab opened for Google to search this picture. Just go through the list of pages where Google has found a particular image and I am sure you will find that template/pattern/life hack you really wanted to see!


It may not be so easy for popular images, but isn't it worth a try?
By the way, the pin I used as an example, is from this beautiful blog:  www.lily.fi
And feel free to take a look at my Pinterest page HERE  !  :)

How to take a close up photo

How to take a close up photoLately I have seen a lot of photos which should show more details - sequin, stitch, maybe some parts of flower or child's eye. My favorite photos are this kind of photography, called macro, so I wanted to share with you simple tip, how to create a good, sharp shot of some close up things.

Those who have a simple camera or use the camera built in your phone may have seen a figure of a little flower as pictured below.
How to take a close up photo


This tulip means your camera will turn to macro photography with focusing on closer elements. You may want to turn off auto focus (AF) and choose the focus distance yourself. This could be fighting for millimeters, so I suggest you to shoot in as bright conditions as possible. If you have shaking hands, a tripod or pile of books/something similar will be your friend to get sharp picture. 

Below you can see a photo taken with macro settings, but AF - as a result the focus is on the ground and behind the main object not the sprout ends witch should be in focus.

How to take a close up photo

The magnolia in the photo below is shot with no macro setting so the camera has found an auto focus point as far as possible.

How to take a close up photo

Sometimes you may want to get the focus on one subject very close and other elements just right after it - out of focus. That is called depth of field and in the camera settings it is the letter F with different numbers. The bigger number follows F letter, the more things will be in focus. The smaller the number the smaller will be line of focus. If you want to see sharp only one part of flower, example stigma, you can use very small F number, like F2 or even F1.8. If you want to see the whole flower sharp, use F8 or different, depending on the size of the subject.

Below I added an example of different of depths of field. First picture is taken on F2 and second - F22.

  
How to take a close up photo

How to take a close up photo

This is my first post about photography so if you want to clear out something mentioned here, feel free to do so in comments!

Thanks for stepping by!


Tool to create HTML code of Etsy treasury

There was a great guy who wrote a script to all those Etsy addicted who wanted to post treasuries to their blogs in kind of fancy way. This men was Martin from White Shark websites. Then something mysterious happen and script stop working and I was really sad. I asked my boyfriend to check this script Martin put out in Internet to everyone who could find the problem on it. And my boyfriend did it- he fixed a bug! YAAY! So now I can create a HTML code of all Etsy treasuries and easily put them in blog not just as static picture, but with all links to each item and shop! You can see below how cool it looks! I am so happy Martin made this tool and my boyfriend fixed it! So, if you want to create HTML code to insert treasury in your blog or website, you can do it at THIS link, while Martin hasn't updated this tool at his page.

'Warm Sunny Week Ahead' by fancystuffdecor


Pansy flower silk blouse for...
$110

Sunshiny and lime Bracelet w...
$13

Romantic Summer Pendant &quo...
$96

Yellow & Green Kentucky Derb...
$149

Zipper pouch coin purse - Te...
$14

clock mosaic / yellow green ...
$125

Summer scarf. Sunflowers sca...
$109

Hand crochet Lariat Scarf Gr...
$20

70's Floral Dress - Mini...
$29

Vintage Earrings - Yellow D...
$20

Ipad Mini Case, Ipad Mini Sl...
$24.5

yellow flower art photograph...
$20

Crocheted Barefoot Sandals -...
$12

Linen Yellow Pillow Cover wi...
$18

Box "cottage garden&quo...
$95

Hand painted tie Mens neckti...
$35

Washi tape holders of wooden slice


washi tape holder made of wooden slices by akwiinas
 While ago I got a branch of irregular, natural wooden slices. Only a few weeks ago I made a beautiful washi tape holders of them and I like the result so much that I decided to share with you. All you need are wooden slices; wooden skewers (I used chopsticks) and drill (size should fit a stick you are using).


washi tape holder made of wooden slices by akwiinas
Irregular, rustic wooden slices I used had even bark left on them

washi tape holder made of wooden slices by akwiinas
Different kind of trees makes different patterns. Big slices for big rolls of washi,
small - for smaller ones

washi tape holder made of wooden slices by akwiinas
Drill in the middle of wooden slice. For extra fixation, you can add a pile of glue.
Than thicker slice, than deeper should be the hole.

washi tape holder made of wooden slices by akwiinas
Show off all your stash of washi tapes! I thought I have only few of them around my desk,
but by using these holders I realized - I have not so less of them! 

washi tape holder made of wooden slices by akwiinas

 washi tape holder by akwiinas


washi tape holder  by akwiinas
Aren't they cute?
 I created a Pinterest board to collect different ideas about washi tape based crafts - Washi tape.
I would love to see how do you storage your washi tapes. Feel free to share a picture or link!


How to make cute thread holders


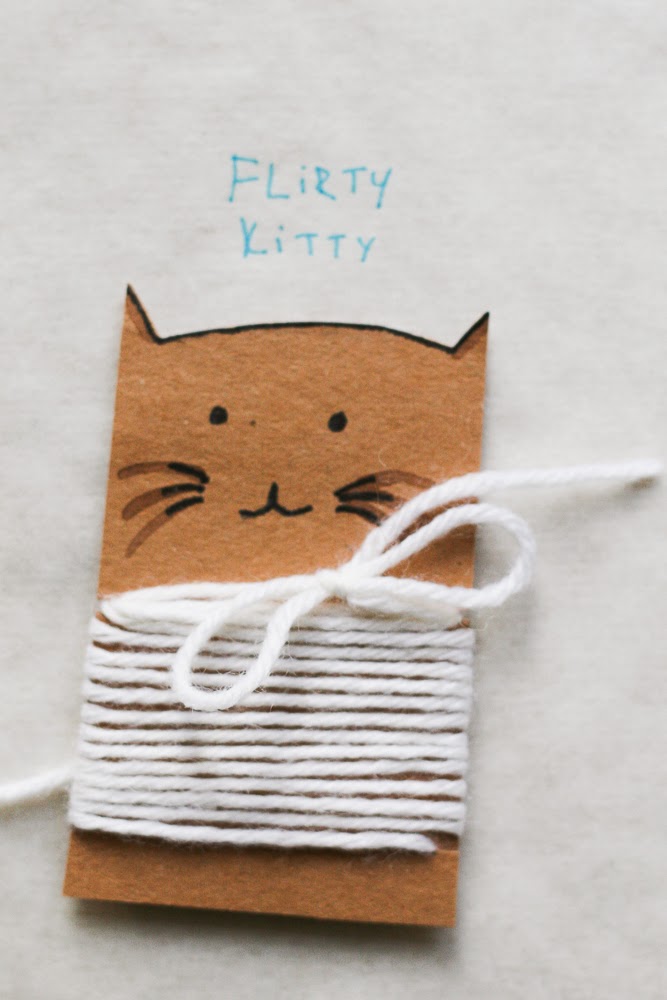
diy tutorial how to make easy animal thread holder by akwiinas
A few weeks ago I made something new - thread holders made of paper. I found this idea in Pinterest and a picture that led me to the Little White Whale blog (there you will see how Gloria originally made her cats).

Let me add some notes from me, how I made my cute animals.
I used:
• thick kraftpaper,
• scissors to cut out a shape,
• Sharpie to draw a face,
• watercolors to paint a face,
• colorful threads or strings.

Like Gloria suggests, you can use cardboard or other thick paper in size of a business card. At first I drew the face and ears, then I cut the right shape. Each animal got his own color of thread and the same color I tried to include in face painting. Depending on the paper you use, animals can hold different threads or yarn.
Below you can see my animal set.


diy tutorial how to make easy animal thread holder by akwiinas

diy tutorial how to make easy animal thread holder by akwiinas

diy tutorial how to make easy animal thread holder by akwiinas

diy tutorial how to make easy animal thread holder by akwiinas

diy tutorial how to make easy animal thread holder by akwiinas

diy tutorial how to make easy animal thread holder by akwiinas

diy tutorial how to make easy animal thread holder by akwiinas

diy tutorial how to make easy animal thread holder by akwiinas

diy tutorial how to make easy animal thread holder by akwiinas

diy tutorial how to make easy animal thread holder by akwiinas

 If you have made something similar, I would love to see your result! 

By the way, I will tell you more about the fairy-tale in the last picture soon!